

Article
Look Outside: All Planet Disc Locations, Number Values & Door Puzzle Solutions
Find every planet disc in Look Outside, learn what each number means, and solve all the locked door puzzles with this complete disc location and combination guide.
Look Outside: All Planet Disc Locations, Number Values & Door Puzzle Solutions
If you’ve been exploring the apartment building in Look Outside, you’ve probably come across mysterious locked doors with circular slots and numbers engraved on them. These doors require Planet Discs, collectible key items scattered throughout the building.
Each disc has a numerical value, and figuring out which combinations unlock the doors is one of the game’s recurring puzzles.
This guide covers where to find every Planet Disc, what the numbers represent, and the combinations needed to unlock each door.
Spoiler Warning: This guide contains locations, puzzle solutions, and minor progression spoilers.
How Do Planet Discs Work?
The Planet Discs are astronomical slides that can be inserted into special locks throughout the apartment building.
Each disc represents a celestial body, and its numerical value generally corresponds to the number of moons associated with that body in the game’s astronomical chart.
For example:
- Earth = 1
- Mars = 2
- Pluto = 5
- Jupiter = 95
If a locked door displays the number 3 and has two slots, inserting Earth (1) and Mars (2) will unlock it.
Some doors require multiple discs to reach a specific total, while others require the values on both sides of an equation to match.
You can also discover disc values yourself using the machine behind the locked doors near Jasper’s reception area on the Ground Floor.
All Planet Disc Values
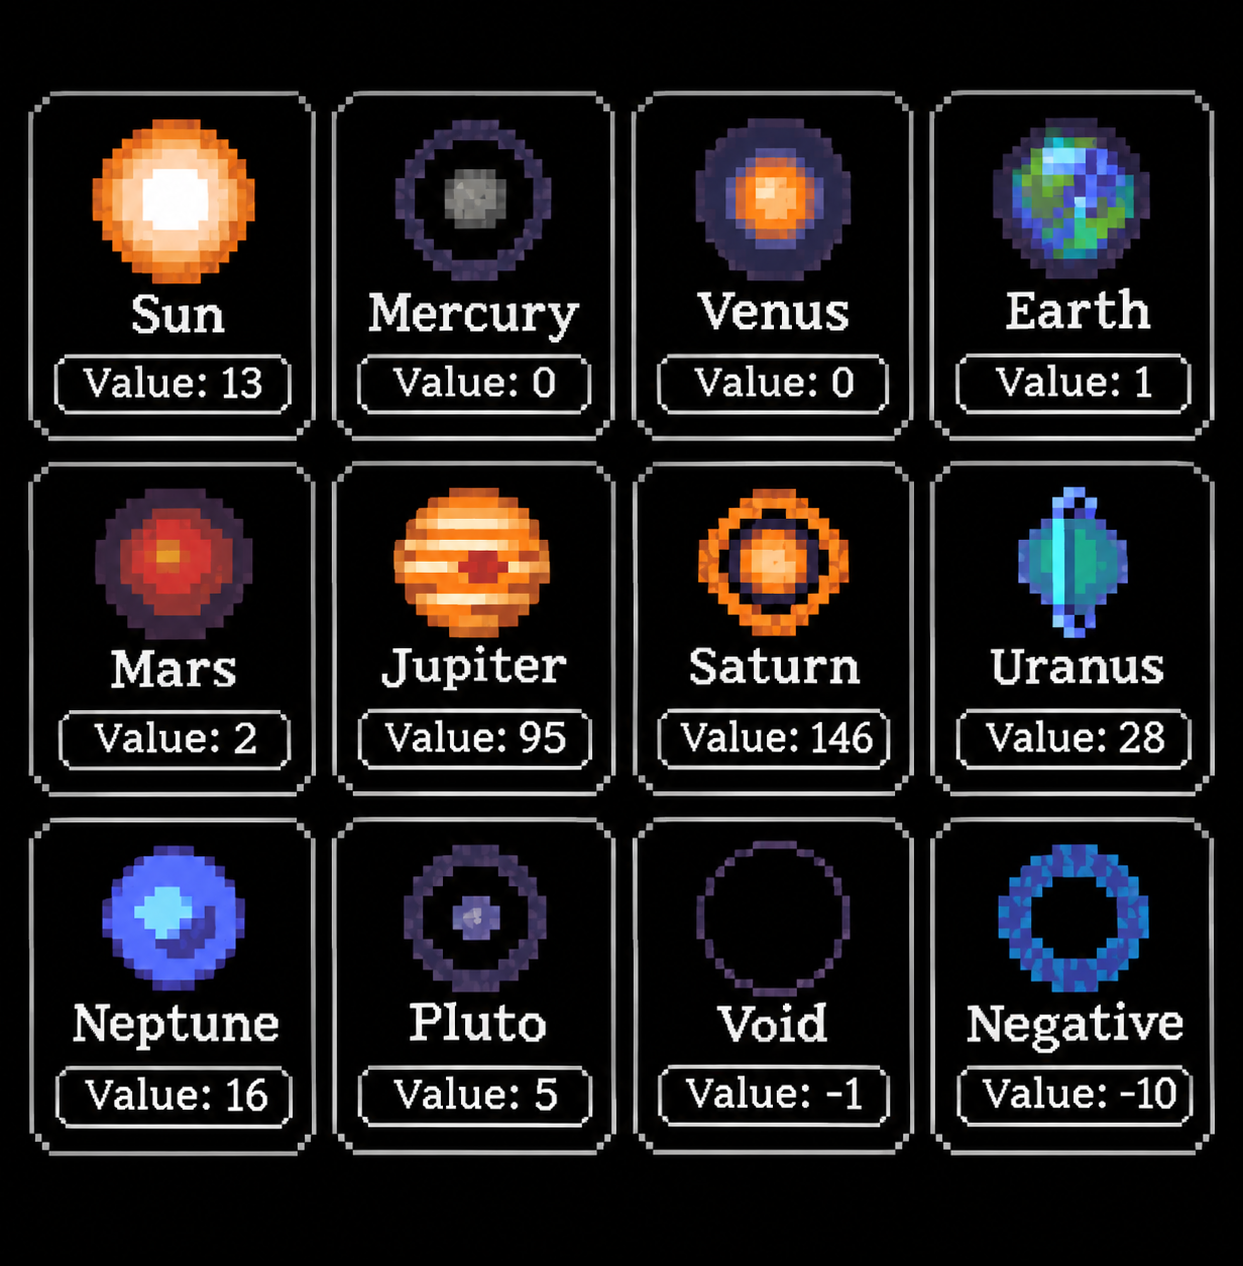
Here is a complete reference list of the discs and their numerical values.
| Planet Disc | Value |
| Void | -1 |
| Negative | -10 |
| Mercury | 0 |
| Venus | 0 |
| Earth | 1 |
| Mars | 2 |
| Pluto | 5 |
| Sun | 13 |
| Neptune | 16 |
| Uranus | 28 |
| Jupiter | 95 |
| Saturn | 146 |
The Void Disc can be transformed into the Negative Disc, so these are two forms of the same collectible rather than two separate discs you can keep simultaneously.
The values are based on the game’s own astronomical system, not necessarily the current real-world number of confirmed moons.
All Planet Disc Locations
Earth Disc — First Floor (1F)
Value: 1
The Earth Disc is one of the first discs you’ll need to obtain.
Head to the labyrinth on the First Floor and locate the room containing a giant mouth embedded in the wall.
You’ll need to feed the mouth before it gives you the Earth Disc.
You can feed it the Baby Rat or sacrifice your arm, although the Baby Rat is the preferable option if you want to avoid the consequences of losing an arm.
Once fed, the mouth spits out the Earth Disc.
Used for: Opening the Mars Disc room, accessing the Ground Floor, and several additional door puzzles.
Mars Disc — First Floor (1F)
Value: 2
The Mars Disc is also located in the First Floor labyrinth.
Find the locked door with a single circular disc slot. Insert the Earth Disc to unlock it.
Inside is a dark room filled with rats and the Rat Freak enemy.
The Mars Disc is located toward the upper portion of this area.
You don’t necessarily have to defeat the Rat Freak to retrieve it. It’s possible to avoid the enemy, grab the disc, and escape.
Used for: Unlocking the Ground Floor and several later puzzles.
Void Disc — Third Floor (3F)
Value: -1
The Void Disc is found in the telescope room of Apartment 31 on the Third Floor.
This area becomes accessible as the story progresses.
You can enter using the Telescope Room Key obtained from Jasper or through the events involving the Stargazer when the apartment lights are turned off.
The Void Disc is found inside the telescope room, along with the Pluto Disc.
Used for: Certain mathematical door combinations and transformation into the Negative Disc.
Negative Disc — Third Floor (3F)
Value: -10
The Negative Disc isn’t found separately. Instead, you create it by transforming the Void Disc.
To do this:
- Obtain the Void Disc from the telescope room in Apartment 31.
- Turn off the apartment’s lights.
- Return to the telescope room while the lights remain off.
- Interact with the telescope and point it outside.
- Locate the projected image on the floor.
- Interact with the projection and place the Void Disc into it.
The Void Disc transforms into the Negative Disc.
This disc is especially useful because its negative value allows you to solve combinations that would otherwise be impossible.
Used for: The optional Security Room door and alternative puzzle combinations.
Pluto Disc — Third Floor (3F)
Value: 5
The Pluto Disc is located in the same telescope room as the Void Disc, inside Apartment 31.
You can collect it regardless of whether the lights are on or off.
It’s worth picking up both discs during the same visit to avoid having to return later.
Used for: Basement storage, the Security Room, and the Saturn door puzzle.
Mercury Disc — Third Floor (3F)
Value: 0
The Mercury Disc is found in the frozen apartment on the Third Floor.
This apartment becomes accessible after several days have passed.
Explore the frozen rooms and search toward the lower-right portion of the apartment to locate the disc.
Although Mercury has a value of zero, it’s still useful for certain door combinations and the Planetarium puzzle.
Venus Disc — Ground Floor (GF)
Value: 0
The Venus Disc is located in the Women’s Bathroom on the Ground Floor.
First, you’ll need access to the Ground Floor by unlocking the stairwell using the Earth and Mars Discs.
Find the Women’s Bathroom near the vending machine area.
The entrance is blocked by fleshy growth, so you’ll need Herbicide to clear it.
Inside the grotesquely transformed bathroom, you’ll find the Venus Disc.
Used for: Zero-value combinations and the Planetarium.
Sun Disc — Ground Floor (GF)
Value: 13
The Sun Disc can be found in the Mailroom on the Ground Floor.
From the main lobby area with the crashed bus, head toward the left-side corridor and enter the Mailroom office.
The disc can be collected here without solving the large Saturn puzzle.
Used for: The reception area puzzles, Security Room, and Planetarium.
Uranus Disc — Ground Floor (GF)
Value: 28
On Normal difficulty, the Uranus Disc is located inside Mutt’s Fish and Chips on the Ground Floor.
Explore the restaurant and check its bathroom to find the disc.
Important: On Cursed difficulty, the Uranus Disc has a different location. Instead, it appears in the bathroom of the eastern Basement apartment near Clyde, which requires three keys to access.
Used for: The reception puzzle, Saturn door, and optional Security Room puzzle.
Jupiter Disc — Ground Floor (GF)
Value: 95
The Jupiter Disc is one of the more involved discs to obtain.
It’s located deep inside the Landlord’s Apartment on the Ground Floor.
You’ll need to progress through the Landlord’s rent events and fully pay the required rent to reach the apartment’s final mutated state.
At this point, the apartment transforms into a sprawling maze of fleshy tunnels.
Explore the maze and work toward the upper-right section to locate the Jupiter Disc.
Be careful, as a dangerous optional enemy patrols the area.
Used for: The Saturn door puzzle and Planetarium.
Neptune Disc — Basement (B1)
Value: 16
The Neptune Disc is located in the Basement’s fungal infection area.
Progress through the sewers and toward the mushroom-filled section beyond the parking garage area.
You’ll encounter passages blocked by large fungal growths and white mushrooms that alter which routes are accessible.
Navigate this area to reach the room containing the Neptune Disc.
Used for: Basement storage, Security Room, Saturn door, and other combinations.
Saturn Disc — Ground Floor (GF)
Value: 146
The Saturn Disc is located behind the large five-slot planet puzzle in the Ground Floor Mailroom.
The door requires a combination totaling 146.
Insert the following discs:
- Jupiter (95)
- Uranus (28)
- Neptune (16)
- Pluto (5)
- Mars (2)
Total: 146
Once the door opens, you’ll find the Saturn Disc along with useful supplies, including a Silver Magnum and ammunition.
The Saturn Disc is also needed for the Planetarium puzzle.
All Planet Disc Door Puzzle Solutions
Now that you know where to find the discs, here’s how to use them to unlock the various doors throughout the building.
First Floor — Apartment 11
Required value: 1
Solution: Earth (1)
Insert the Earth Disc into the single slot.
First Floor — Mars Disc Room
Required value: 1
Solution: Earth (1)
This is the room containing the Mars Disc and Rat Freak.
Ground Floor — Stairwell Entrance
Required value: 3
Solution: Earth (1) + Mars (2) = 3
This is an important progression puzzle because it grants access to the Ground Floor.
Keep in mind that discs left inside locks may need to be retrieved or replaced with another valid combination later.
Ground Floor — Reception Office, First Door
Required value: 29
Solution: Earth (1) + Uranus (28) = 29
Alternative: Sun (13) + Neptune (16) = 29
This door is located near Jasper’s reception area.
Behind it, you’ll find a machine that can display the numerical value of inserted discs.
Ground Floor — Reception Office, Second Door
Required value: 15
Solution: Mars (2) + Sun (13) = 15
This is the second locked door farther inside the reception area.
Beyond it is the Unlabeled Cartridge, which is connected to additional hidden content.
Ground Floor — Saturn Door
Required value: 146
Solution:
Jupiter (95) + Uranus (28) + Neptune (16) + Pluto (5) + Mars (2) = 146
This five-disc puzzle is located in the Mailroom.
It unlocks the room containing the Saturn Disc and valuable equipment.
Basement — Security Room Entrance
Required condition: Both sides must equal the same number.
Recommended solution:
Left side: Sun (13) + Pluto (5) = 18
Right side: Mars (2) + Neptune (16) = 18
Since both sides equal 18, the door unlocks.
Unlike most of the other doors, this puzzle is based on equality rather than simply reaching one displayed total.
There are multiple valid solutions, but this is one of the easiest to remember.
Basement — Security Room Optional Door
Required value: 18
Solution: Uranus (28) + Negative (-10) = 18
This optional door leads to a supply room containing useful combat equipment and consumables.
You’ll need to transform the Void Disc into the Negative Disc to use this particular combination.
One important detail: the discs used in the Security Room entrance remain occupied by that lock. Plan your combinations so you have two discs available for the interior door.
Basement — Storage Room, Pluto Door
Required value: 5
Solution: Pluto (5)
Located in the Basement storage/sewer area near Hungry Steve.
Inside, you’ll find a safe that requires a five-digit code.
The code comes from completing the Crossword Puzzles book and is generated separately for each playthrough.
Basement — Storage Room, Neptune Door
Required value: 16
Solution: Neptune (16)
This door is located in the same general storage area.
It leads into a freezer room containing supplies and additional items.
Planetarium Disc Puzzle — Correct Order
The Planetarium is a separate disc puzzle connected to the game’s deeper story and endings.
Unlike the numbered door locks, this puzzle requires arranging the astronomical discs in the correct order.
You’ll find the Planetarium through a hidden passage in Apartment 12 on the First Floor.
You’ll need Herbicide to uncover the hidden entrance and the keypad code found in Sybil’s notes.
Keypad code: 187552
Once inside, insert the discs in the following order, starting from the center:
- Sun
- Mercury
- Venus
- Earth
- Mars
- Jupiter
- Saturn
- Uranus
- Neptune
Completing the arrangement solves the Planetarium puzzle and opens the next area.
Notice that Pluto isn’t part of this particular sequence.
Tips for Solving Planet Disc Puzzles
Remember that discs can be reused.
In many cases, you can retrieve discs from locks after opening doors. However, removing discs may cause certain doors to close again, so be careful about where you leave them.
Keep the Negative Disc in mind.
Its value of -10 makes it particularly useful for combinations involving higher-value discs.
For example, Uranus (28) + Negative (-10) = 18.
Zero-value discs aren’t useless.
Mercury and Venus both have a value of zero. They can help satisfy locks requiring multiple discs without changing the total.
Not every door has only one solution.
Some doors can be opened using different mathematical combinations. The Security Room entrance is a good example.
Collect discs as you explore.
Even if you don’t need a particular disc immediately, picking it up when you find it can save you a lot of backtracking later.
Quick Reference: Every Door Combination
For anyone who just wants the answers without scrolling through the entire guide:
| Door | Disc Combination |
| First Floor single-slot doors | Earth |
| Ground Floor stairwell | Earth + Mars |
| Reception first door | Earth + Uranus |
| Reception second door | Mars + Sun |
| Saturn door | Jupiter + Uranus + Neptune + Pluto + Mars |
| Security Room entrance | Sun + Pluto = Mars + Neptune |
| Security Room optional door | Uranus + Negative |
| Basement storage (5) | Pluto |
| Basement storage (16) | Neptune |
Final Thoughts
The Planet Disc puzzles in Look Outside can seem confusing at first, especially when you start encountering doors that require several discs or matching equations.
Once you realize that the numbers correspond to the game’s moon-count values, the system becomes much easier to understand.
The trickiest parts are usually locating the more obscure discs, figuring out how to create the Negative Disc, and managing discs that are already inserted into other locks.
Hopefully, this guide saves you some unnecessary wandering through the building — although getting hopelessly lost is admittedly part of the Look Outside experience.